Showing posts with label what's cooking. Show all posts

No Food Coloring Green Pancakes

These no food coloring green pancakes have been a hit in our house for years now. I'm finally getting around to doing a post for them (I guess better late than never). I realized I haven't done a recipe post since, well, it feels like back in the day, when I made these Honey Lavender Cupcakes with Cream Cheese Frosting.

That was back when I only had one kid and actually had time to take pictures of food. Now, ha, I'm lucky I was able to snap a few pics of these before they were devoured or little fingers grabbing at them. But that's the thing, they're that good, and my whole family loves them. 

With St. Patrick's day around the corner, we usually like to celebrate with a few fun food themed items. If you visit this little space of mine often (always a huge thank you to those that do), then you know breakfast is kind of a big deal for my family. We're one of those, could eat breakfast at any time, families. 

What I love about these green pancakes is there is absolutely no food coloring in them. Yup, you read that right. I can't even remember exactly where I got this recipe from. Probably during one of my late night Pinterest rabbit hole episodes of how in the world did I end up here, moments. I've added a few of my own things over the years and tweaked measurements since we usually make a bunch and then save some to eat throughout the week. Let's just say at this point I basically eyeball things and add a pinch of this and a dash of that. Who else has recipes like that? 

The best part is, the ingredients that are in here are things that I'm happy my kids are eating. So what's the secret (if that's what we're calling it), to the color you say? Spinach. Yes, spinach! And, don't pull your nose up at it before you try it, because I seriously can't make these fast enough before the last batch is being devoured, and not just by my kids.


INGREDIENTS:

1 cup of fresh spinach packed (I usually add a little more or little less depending on the size of the leaves)
1 ripe banana 
2 Tspoons of creamy peanut butter (add more if you're a fan)
1 tspoon of flax seeds (optional)
1 1/2 cup of milk (I use almond milk, but any will do)
1 cup of complete pancake mix, add more if you like them fluffy 
1 Tspoon of vanilla or almond extract (optional)
1 tspoon of ground cinnamon (optional) 

DIRECTIONS:

In a food processor ground up your flax seeds first (if you are using them). Then combine spinach, banana, peanut butter, flax seeds, milk, and vanilla. Mix until all ingredients are blended.

In a separate mixing bowl, pour in your blended items and then mix in your pancake mix until all ingredients are combined. In a large frying pan or griddle, on medium heat, pour batter into desired pancake sizes flipping half way through until cooked to a light golden brown.

Healthy Pancakes
These have certainly taken our pancake breakfasts to another level and I hope that you enjoy them as well! Serve them with your favorite breakfast meats or side of fresh fruit for a little something extra. 

Honey Lavender Cupcakes With Cream Cheese Frosting

No matter what age you are everyone seems to enjoy a good cupcake. Although I would never turn down a good funfetti cupcake, I was headed to a party and wanted to bring along cupcakes with a unique flavor.

Last year I made theses tasty Blueberry Lavender Muffins and since lavender is one of the only successful things growing in our garden this year, we thought why not incorporate it into a sweet treat! So what else better to do then turn to the good old web (thank God for Pinterest) and came across a recipe from better homes and gardens and decided to put a twist on it. 

Ingredients:

Cupcakes
1 3/4 cups all-purpose flour
1 cup of sugar
2 eggs room temp
1 1/2 teaspoons baking powder
2 teaspoons dried lavender (we added a pinch extra)
1/2 teaspoon of salt

1/2 cup butter at room temp 1 teaspoon of vanilla
1/4 cup of honey (we added a little extra)
2/3 cup of milk


Cream Cheese Frosting:
8 ounces cream cheese room temp

3 cups of powdered sugar
1/2 teaspoon of vanilla
2 tablespoons butter room temp


Directions:
Preheat oven to 350 degrees F. In a medium mixing bowl combine flour, baking powder, lavender, and salt. Set the dry mixture aside. In a large mixing bowl, with an electric mixer, beat the butter on medium to high speed for 30 seconds. Add in sugar, honey, and vanilla. Beat together until ingredients are combined. Add in one egg at a time, beating well after each time you add one. Alternately add in your dry mixture, and milk, to butter mixture. Beat together on low speed after each addition only until the ingredients are combined. In a lined muffin pan, spoon batter into each section filling them about half way. 

Bake for 16 to 18 minutes or until an insert in the center comes out clean. Cool cupcakes on a wire cooling rack for 10 minutes. 

In a large mixing bowl beat together the cream cheese, butter,  and vanilla on medium speed until light and fluffy. Gradually add in 1 cup of  powdered sugar at a time, beating together after each addition. Continue to beat the ingredients together until you have reached spreading consistency.

Once your cupcakes have cooled completely, ice them with the cream cheese frosting.

Breaded Eggplant Bites


Eggplant seems to be one of those vegetables that we get stuck preparing only a few ways that we know how. Eggplant parm or grilled eggplant. While we aren't complaining about either of those options, after we went to our local farmers market last week, we picked up a few fresh organic eggplants and wanted to try something a little different. 

Back in the beginning of our blogging days, you know the posts that had horrible pictures, you didn't really know what you were doing, and couldn't understand why no one was sharing or commenting on your content. Don't leave us hanging, you know we've all been there. Anyway, we made some breaded okra bites (read if you dare) and decided to do something similar with our eggplants. 

Ingredients: 
2 medium eggplants or 1 large eggplant
1 1/2 cups of Italian style breadcrumbs (may need more depending on the size of your eggplant)
1 cup of flour
3 eggs
Additional Italian seasoning, pepper, and parsley. Optional, we like to add even more spices to our breadcrumbs for extra flavor
Vegetable oil for frying 

Directions:
Peel the eggplants and dice them into about 1 inch cubes. In three separate bowls add in one for breadcrumbs (and additional seasonings if you'd like), one for eggs (whisk them, we also add a dab of milk), and one for flour.

Bread the eggplant cubes, start by dipping them in flour, then the eggs, and then the breadcrumbs. In a large frying pan add in about 2 1/2 inches of oil. On medium heat let the oil warm up. Side note, we do not have a deep frying thermometer so we eye balled it. But if you do, the heat should be around 360 degrees Fahrenheit. 

Once oil is heated place eggplant bites into the frying pan and cook until each side is golden brown. On a paper towel lined plate or cookie sheet transfer the cooked eggplant bites to cool and remove any excess oil. For taste, you can also sprinkle them with salt or extra parsley for garnishment. We used a good old jar of marinara sauce but if you're savvy at making your own, go for it! 

These were a hit with our family and there's always a fun appeal about getting to eat certain foods with your hands. For the more sophisticated a fork does just fine.

Breaded Eggplant Bites

Lemon Basil Garlic Shrimp Pasta

Lemon Basil Garlic Shrimp Pasta

This might be a mouthful of a title to say, but this will definitely leave your taste buds happy. We love shrimp, especially in the summer. Throw some garlic, lemon, and basil into the mix and we will take it! 

Garlic basil shrimp

Ingredients:
1 lb peeled and deveined large shrimp
1 box (or 1 lb) of linguine
3 chopped cloves of garlic 
1 tomato seeded and diced
1/4 cup of chopped fresh basil
1 lemon cut into wedges (about 2 Tbsp of juice)
4 Tbsp of olive oil
1 tsp of crushed black pepper (we love pepper so you might want to use to taste)

Directions:
Bring water to a boil and cook pasta for 8 minutes. Drain pasta and add in 2 Tbsp of olive oil or more to taste. Toss pasta. In a separate frying pan add 2 Tbsp of olive oil, garlic, and tomatoes. Let simmer for two minutes. Add in Shrimp and black pepper. Let shrimp cook for 3-4 minutes or until light pink. Place pasta on a plate and top with cooked, shrimp, garlic, and tomatoes. Take lemon wedges and squeeze over the plate (be careful of the seeds). Top with fresh chopped basil and enjoy. 

Lemon Basil Garlic Shrimp Pasta

Fish Tacos With Mango Pineapple Salsa

Fish Tacos With Mango Pineapple Salsa

There's something about tacos and Tuesday's that just go hand in hand. It only seems right to post this on a Tuesday and get everyone craving tacos. You can thank us later :) If you follow us on Instagram (if not, what are you waiting for?) then we have to admit, we didn't actually make these on a Tuesday. But, let's face it, tacos are more than welcome any day of the week! 

These fish tacos with homemade mango pineapple salsa came out so good that we were practically licking the plate. Not to brag or anything, but these were really good. Well, at least we thought so and everyone went back for seconds. 

Pineapple Mango Salsa

Ingredients:
1 lb white fish
1 Tspoon of cooking oil (we used organic virgin coconut oil)
1 tspoon of ground cumin
1 Tspoon of paprika
1 lime, juiced
1/4 cup chopped fresh cilantro leaves
1/4 of red cabbage chopped (used for garnishment to top tacos)

Directions:
Place fish in a medium sized dish and add in cumin, paprika, lime juice, and cilantro. Let marinate for 15-20 minutes. In a medium skillet add in cooking oil and bring to medium-high heat. Place fish in the pan and let each side cook for 4-5 minutes until desired consistency. 

MANGO PINEAPPLE SALSA 

Ingredients:
1 Mango diced
1 cup of fresh pineapple diced
1/4 cup of red onion diced (or more to your taste)
1 medium tomato, seeded and chopped
1 lime, juiced
1/3 cup of chopped fresh cilantro leaves (or more or less to taste)
Salt to taste

Directions:
In a large bowl combine ingredient and toss together. Cover and let stand in the fridge until ready to serve. We topped our fish tacos off with this and also enjoyed it with tortilla chips by itself. 

6 Energizing Hearty Breakfast Toast

6 Energizing Hearty Breakfast Toast

We can all use a little jump start in the morning, but if you're anything like us mornings just aren't our thing. It's tough enough to leave time to get ourselves ready along with all the other things we need to remember for the day, so breakfast needs to be quick yet healthy. Yes, we grab the occasional cereal bar and eat a yogurt at our desk but for those days where we have a few extra minutes to chew our food, these are always a tasty choice.

The great thing about these energizing toasts are majority of them don't have ingredients that need a lot of prep or cooking time. Well, minus the hard boiled eggs (but you can still do that the night before) and the egg inside the pretty little red pepper cut out. 

The next time you are stumped with what to eat in the morning and want something that is going to add some extra umph to your toast aside from slapping on some jelly, check out these combos we enjoy.  

6 Energizing Hearty Breakfast Toast

(first picture posted, starting from top left)

1. Cottage Cheese + Cantaloupe + Agave Nectar 
2. Spinach + Kale + Red Pepper + Egg
3. Cream Cheese + Almonds + Dried Cranberries
4. Peanut Butter + Apple Slices + Flax Seeds + Honey
5. Avocado + Tomato
6. Hummus + Red Peppers + Hard Boiled Egg

Delicious Deviled Eggs

Delicious Deviled Eggs Recipe

Deviled Eggs done right can be so enjoyable. We shied away from attempting them for the longest time because we always thought they were much harder than they are. Since that isn't the case, we are sharing our version with you. We've come across some eggs that have too much mayo in them, the mustard is overbearing, and the eggs are just rubbery. Here's what worked for us and how we enjoy our eggs.

Ingredients:
1 dozen of eggs
1/3 cup of mayo
2 teaspoons of dijon mustard
1 tablespoon of pickle juice
paprika for garnishment

Directions:
In a large saucepan carefully place the eggs in cool water with about an inch and half of extra water covering the top of them. Bring the water to a strong boil for about 10-12 minutes. Turn the burner off and let the eggs stand for an extra two minutes. Then, drain the hot water and run cold water over the eggs. We then put the eggs, with the cold water, in the fridge for about 15 minutes. 

Once the eggs are cool, we then crack and peel them. After they are peeled, we rinse the eggs again to knock off any small pieces of shell and pat dry. Placing the eggs on a cutting board, using a sharp knife (not a serrated knife, it will cause the eggs to have funky lines when you cut them) slice the eggs in half length wise. Remove the yolks and place in a separate bowl. Once you have sliced all of your eggs and removed the yolks, place egg halves on a serving tray. 

Using a fork, mash the egg yolks in your mixing bowl. Add in mayo, mustard, pickle juice and mix together. Depending on the consistency you are trying to achieve you can gradually add in more mayo. Using a piping bag, fill the center of the egg halves. You don't need a piping bag, but if you are using a spoon, be careful to only put the egg mixture in the center. No one likes a gloopy egg. Sprinkle a small amount of paprika on top and serve. 

deviled eggs recipe

We'll let you in on a little secret...for the longest time when we were growing up our mom called them angel eggs. We guess she didn't really want to entertain the whole devil part? Who knows. It wasn't until much later we actually realized what they were called and why people looked at us so weird when we called them angel eggs.

Homemade French Toast Sticks

Homemade French Toast Sticks

There is something so great about breakfast food that we could eat it at any point during the day. With both of us having busy schedules between school, work, little man, and well, just every day life, grabbing something quick and easy does help to save time. Here's how we made our homemade french toast sticks and they have been a hit with anyone who has tried them.These are easy to freeze and to use throughout the week.

Ingredients: 
Loaf of uncut bread
4 eggs
1/4 cup of milk
1 tspoon of cinnamon
1 tspoon of vanilla


Directions: 
Taking your loaf of uncut bread, cut slices about 1/2 inch thick. Side note, from what we have seen it's best to let the bread begin to get stale before using it for the french toast sticks. If you use a loaf of fresh bread it may turn out soggy. 


After slicing your loaf, now take each slice and cut it into three sections. Taking your eggs, beat them until the yokes are cracked. Add in the cinnamon, vanilla, and milk, and beat again. Taking each portion of your bread, dip it into the egg mixture. Each side of the french toast stick should be coated. However, you should dip them quickly. If you leave them or drop them fully into the mixture they can also become too soggy. In a large frying pan on medium heat, sprayed with cooking spray, place the sticks in the pan. Turn them every few minutes until each side is golden brown. Let cool and enjoy! 

Homemade French Toast Sticks

Blueberry Green Tea Smoothie

Blueberry Green Tea Smoothie

We pretty much love anything with green tea in it, so adding it to a smoothie just made sense! This tasty blend of green tea, blueberries and agave nectar was just the right amount of sweet while enjoying some power packed nutrients. Our blender isn't the best so you will see larger pieces of blueberry and it kind of turned out more like a slushie. Even if you don't have a top of the line blender mixing this up will still be a treat. 

Ingredients:
1 cup of water boiled 
2 green tea bags
1 cup of fresh or frozen blueberries
1/2 cup of ice cubes
1 Tablespoon of agave nectar

Directions:
Boil water and add in the 2 green tea bags. You can brew your tea the night before to save time in the morning or you will need to wait until the tea cools off to blend it. You can also add the green tea to an ice cube tray and put the blueberries in it to freeze them and then blend together, but we weren't patient enough for that. We added our tea to the blender, added in the blueberries, ice cubes, and agave nectar. Blended them together and then poured and enjoyed.

Homemade Peanut Brittle

Homemade Peanut Brittle

Peanuts, pretzels, crunchy goodness, we'll take it! Our mom has been making this peanut brittle for years and without a doubt every year there are new fans who drool over it. We remember our mom being a little reluctant to giving out the recipe because it was kind of her thing, you know that staple item you bring to holiday parties. But, she's passed down the recipe to us and we've come to terms with sharing (it's the right thing to do). We are now putting it out there for everyone to enjoy :) 

We've come in contact with other peanut brittle but there's just something about this one. Others are extremely chewy, like almost break your teeth crunchy, and this one is more of a creamy yet crunchy goodness. It might be something you need to taste to be able to relate. 


Ingredients:
1 package of peanut butter chips 10oz
1 package of butterscotch chips 11oz
3 Tspoons of creamy peanut butter
1 cup of smashed pretzel pieces (we usually buy the small skinny sticks and break them up)
1 cup of peanuts (we usually use the honey roasted kind)

Directions:
In a large sauce pan on low to medium heat, melt down half the bag of peanut butter and butterscotch chips. Stirring every few seconds. Be careful not to put the heat on too high or the chips will burn and not melt. Stir in the remaining half bags of peanut butter chips and butterscotch. 

Once majority of the chips are melted add in the 3 table spoons of creamy peanut butter, mix together. Then add in the pretzels and peanuts. Stirring all ingredients together. 

After you have stirred them together, on a baking sheet lined with wax paper, pour mixture onto the middle of the sheet and spread evenly. It should cover the whole sheet and look something like this...leave it to harden in a cool place for an hour. After brittle has fully hardened break into desired pieces and enjoy! 


Harvest Salad With Warm Honey Dressing


With thanksgiving this week, can you believe it's here again? I wanted to share this simple but ever so tasty harvest salad. It's so easy to get caught up with the everyday hustle and bustle (we are all human now), but sometimes all it takes is a simple reminder to have us stop and realize there is always something to be thankful for. For us, those little reminders often happen with fall and harvest food. Anything fall related sparks those little triggers that this is the season of thankfulness. 


Ingredients: 
Mixed greens
Dried cranberries
Chopped walnuts
Bosc pear
Roasted butternut squash seeds
Warmed honey
Romano cheese 


Directions:
Take a ripe bosc pear and slice through the core. Taking your knife core out the center making a round hole in the middle of each slice. Once you have done that, you can re-stack the pear slices to create a full pear look (this is all for looks). Using your mixed greens, about 1 cup for individual salad, but you can really use how ever much you would like, put together on a plate or bowl. Place your pear slices on the mixed greens and add in chopped walnuts, dried cranberries and roasted butternut squash seeds. Taking your honey, about 1 Tspoon, warm in the microwave for 10 seconds and drizzle on top of the salad. Top it off with some fresh or sprinkled romano cheese. 


Roasted Butternut Squash Seeds:
We decided to add some roasted Butternut Squash seeds that we made from another recipe. You might think this seasoning combo sounds a little crazy but they actually turned out really good and now this is how we roast our seeds. 

Ingredients: 
1 Butternut squash

Directions: 
Cut butternut squash in half and scoop out the seeds. Place seeds on a non-stick cooking sheet. Season with crushed black pepper and kettle corn seasoning mix, can be found here. Place in the oven at 375 degrees, check them in about 5 minutes and stir them or try to flip them on the tray. Place back in the oven for another few minutes until they are golden brown. Let cool and enjoy! 


Homemade Roasted Peppers


You may have seen a few weeks back on our friday favorites that we made some homemade roasted peppers. They were so good and super simple that we couldn't hold out on sharing them with you! 


Ingredients:
8-10 large bell peppers, red, green, or really any color for that matter. (will make one jar) 
pure olive oil
salt 
pepper
1-2 cloves of garlic, peeled and sliced
Canning jars

Optional: If you want to get fancy with the seasoning you could always use rosemary or any other creative flavor. 
It's important to point out that we were not making these to preserve them. There are other methods to use if you are looking to make preserved jarred peppers. These will keep well in the fridge for up to 2 weeks. 


Directions:
Set your oven to broil on high. Place peppers on a baking sheet. Once in the oven make sure to flip the peppers one you see them start to blacken (about 6-7 minutes). Once both sides are done take them out and place them in foil or on a towel to let them cool. Once peppers have cooled and are manageable, remove the skin. Then remove the stems, seeds, and core if you roasted them whole. Then cut into desired length. Some people like larger cuts and others thin slices, do whatever you prefer. Using the canning jars add peppers, olive oil (warmed in a pan), garlic, salt and pepper to taste. Using a spoon or utensil make sure peppers are submerged in the oil. Make sure they are cool before placing in the refrigerator. Let stand for 24 hours. Enjoy on fresh sandwiches, salads, pizza, you name it!

Honey Cream Cheese Apple Dip


With apple season in full swing we wanted something sweet and tasty to dip our slices in. I searched all over Pinterest for some inspiration but all we really came across were caramel dips. They sounded good but caramel is not something I keep stocked in the pantry. But, honey and brown sugar...well that's another story. So putting my taste buds together with the ingredients we already had and voila, honey cream cheese apple dip! We took this along to our friends pumpkin carving party and so the dipping began! 

Ingredients: 
1 8 oz package of cream cheese
6 Tspoons of honey
1 Tspoon of vanilla extract
1/2 cup of packed brown sugar


Directions:
In a medium mixing bowl beat softened cream cheese with electric mixer on medium speed until creamy. Add honey, brown sugar, and vanilla. Mix and beat until all ingredients are blended. 

Serve with apple slices. We also brought along pretzels and graham crackers for those who weren't craving the apples. 
 

Healthy Fall Treats For Toddlers


Until recently my little guy was always a great eater. It's like he knows he's now one and transitioned out of that baby phase into toddlerhood. Slow down buddy, let's not get ahead of ourselves. Even though he doesn't really understand fall and the upcoming holiday season I still want to include him in on the fun. 

I took some of his favorite foods that I know he will eat and added a fall twist to them. We recently went apple picking so making apple sauce was a no brainer. I added Strawberries and his not so favorite Spinach, and you know what? He loved both of them!

Stawberry Apple Sauce
Ingredients:
2 large apples
4 medium sized strawberries

Directions:
Peel apples and boil in a medium sauce pan until apples are soft. Cut the tops off of stawberries. In a blender or food processor (we used the baby bullet) blend apples and strawberries.

Spinach Apple Sauce
Ingredients:
2 large apples
1/2 cup of spinach leaves, fresh or frozen

Directions:
Peel apples and boil in a medium sauce pan until apples are soft. Boil spinach leaves with apples. If using fresh they will be ready really quickly. Add to boiling water and let boil for about 2-3 minute. Drain and add both apples and spinach to a blender or food processor. Blend together. 


My little guy loves fruit. Well most fruits. I saw a lot of different twists on healthier candy corn floating around out there but you know what, my little guy isn't loving pineapple and oranges just yet, so I went with what I knew he would love. Fall fruit and yogurt parfait with banana and cantaloupe.

Ingredients:
1 medium sized banana
1/4 of cantaloupe
1/3 cup of vanilla yogurt (we used organic baby yogurt)

Directions:
Slice bananas and cantaloupe. Fill bottom of bowl with cantaloupe, layer with banana, add yogurt on top.


My little guy would seriously eat a whole block of cheese if we let him (he takes after his mother). This is definitely a little cheesy (pun intended :) but instead of using cookie cutters for what they are made for, cookies, we put them to work on a slab of cheese. And there you have it a cheesekin! And kind of modified because out cutter was a little bigger than the slab of cheese.

Cheesekin
Ingredients:
Block cheese
Fall cookie cutters

Directions:
Slice a large piece of cheese from a cheese block. This will depend on the size of your cookie cutter. Mine was actually to large for the standard size block cheese that I had so I improvised and cut it in pieces. 

Happy fall everyone and I hope your little eaters aren't becoming as picky as mine. 

Homemade Zucchini Bread


There's something about a good homemade bread that welcomes in the season of fall. Not that bread can't be enjoyed all throughout the year but we are convinced that certain foods just taste better in specific seasons (it's ok, you can call us crazy). If you've been reading our blog (and we greatly thank you if you have), we kind of like zucchini. That might be an understatement, we really like zucchini, it's definitely our go to vegetable. It was even grown in the garden this year and thoroughly enjoyed by us :) To start off some fall baking we made a homemade zucchini bread and are sharing this ever so tasty recipe with you!


Ingredients:
3 cups of all purpose flour
1 tspoon of salt
1 tspoon of baking powder
1 tspoon of baking soda
3 eggs
3 tspoons of ground cinnamon (we like cinnamon so we did 4 tspoons, it's up to you)
1 cup vegetable oil
2 1/4 cup of sugar
3 tspoons of vanilla extract 
2 cups grated zucchini 
1 cup chocolate chips (optional)
1 cup chopped walnuts (optional)
 
Directions:
Preheat oven to 325 degrees F. Grease and flour two 8x4 inch pans or you can use this recipe to make muffins. In that case use a muffin pan 12 or two 6 pans.

Sift flour, salt, baking powder, soda, and cinnamon together in a bowl.

Beat eggs, oil, vanilla, and sugar together in a large bowl. Add your previous separated dry ingredients (see line above) to the creamed mixture, and beat well. Stir in zucchini, nuts and chocolate chips. Pour your combined batter into prepared pans.

Bake for 40 to 60 minutes, or until the edges are golden brown or a tester insert comes out clean. Cool in the pan they were baked in on a rack for about 20 minutes. Remove bread or muffins and let completely cool.
 

Fruit and Herb Infused Waters

Summer may be winding down but there's still time to add a little something extra to your water. If you've been reading along, and we thank you if you have, we previously did a post about Infused Waters. This time around we decided to incorporate herbs and some of them fresh from the garden. Not only does this add some great flavor to your water but infused waters have also been said to help increase energy and can act as natural detoxes for your body. We hope you find these combinations enjoyable and would love to hear some ways you have naturally flavored your water? 

Fruit and Herb Infused Water


Cucumber Lemon Lavender Infused Water

Combinations
Watermelon + Basil
Cucumber + Lemon + Lavender
Blackberry + Sage

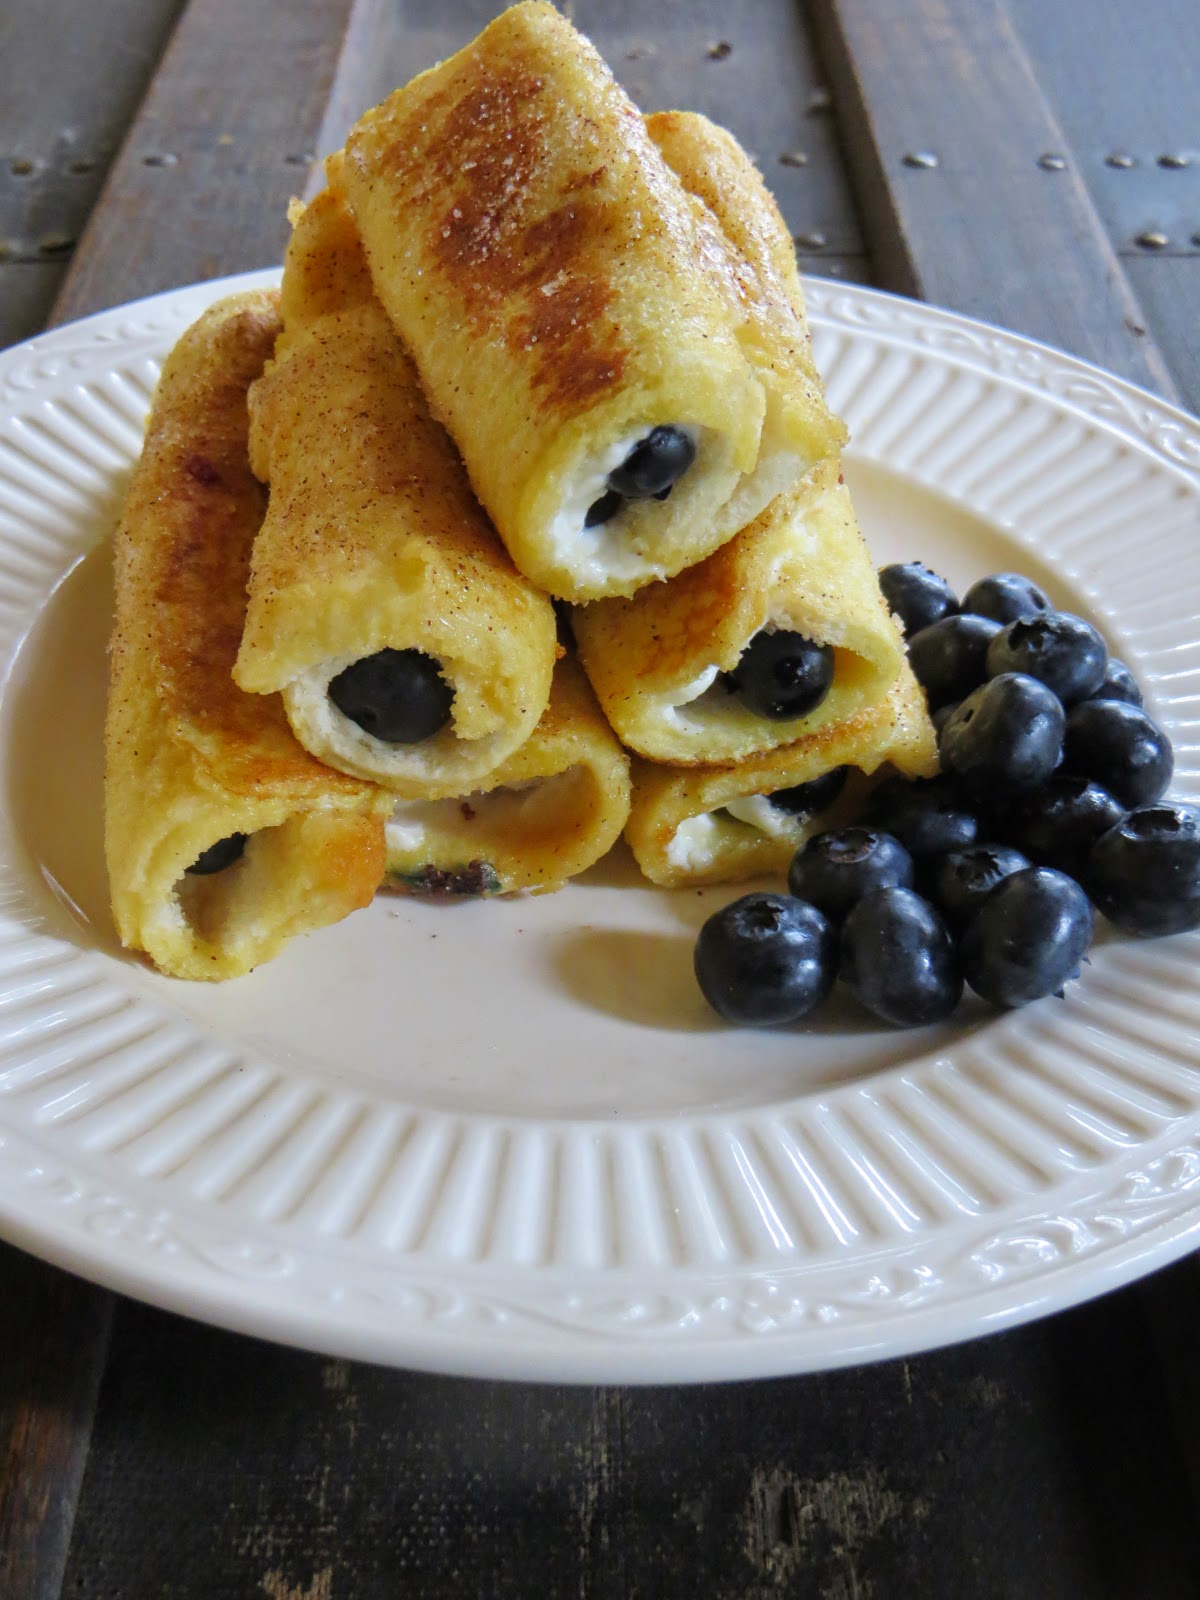
Blueberry Cream Cheese Roll Ups

You may have noticed we've been sharing a few blueberry recipes lately. We hope you aren't tired of them! Between all of us we picked over 10 lbs of blueberries so we had a lot to work with. These roll ups are easy to make and taste delicious! You can eat them by hand dipping them into your favorite syrup, eating them plain, or cutting them up and drizzling them with syrup. However you choose to eat them is up to you but we sure hope you enjoy them!

Blueberry Cream Cheese Roll Ups
Ingredients:
12 slices of bread (for rolling we saw that white bread works best)
3/4 cup of cream cheese softened (about 6 oz)
1 cup of blueberries-fresh or frozen
2 eggs
1 tspoon of vanilla extract
1/2 cup of cinnamon and sugar 


Directions:
Cut the crust off your bread slices. With a rolling pin flatten each slice of bread, this will make it easier when it comes time for rolling. Soften your cream cheese but be sure not to melt it completely. 
Once you have flattened your bread slices, take your cream cheese and spread about a tablespoon onto each slice of bread. Top the spread off with blueberries. If you add to many you may loose a few when rolling. Taking one corner of your bread, tuck under and begin to roll. 
In a medium sized mixing bowl add 2 eggs and 1 tspoon of vanilla. Beat eggs until yokes have broken. Take your roll ups and coat them in the egg mixture. 
In a large frying pan with heat on medium place the roll ups in the pan to be cooked. It is important to flip them half way through so each side can get golden brown. 
Once roll ups are golden brown remove from heat onto a separate dish. Sprinkle or roll in cinnamon sugar and enjoy :)
Copyright © Beautifully Candid 2017. All Rights Reserved. Powered by Blogger.