

Ok, I got my water, even added a slice of lemon to it (we fancy), and now I'm sitting at my desk with full focus (hopefully) to share with you how we created these wallpaper masterpieces. Ah ha! Maybe that's what I should title this? Although, masterpiece status could probably be argued 10 ways to Sunday, so let's move on.
Are you still with me after all that random rambling? I hope so. Because we're just about to get into the good stuff. These wallpaper thing-u-ma-bobs. If you caught my insta stories over the summer, then you probably saw a sneak peek that we were working on this little project. Most of you have probably heard me mention this before, that my decor approach has been about having less and focusing on some statement pieces throughout the house. If you're visiting, hear me out for a minute. I used to think that my walls needed to be filled with things, or a lot of decor pieces scattered throughout each room, in order for it to feel finished. Maybe it was more so that I thought I needed more to show because that showed I had somewhat of a sense of style. But what I think makes someone's style so unique, is their own approach to it. The things that make them happy, and what they feel when they walk into a room in their own home. Maybe some like having a lot on their walls because that's their sense of cozy. But what I noticed about myself was, walking into rooms like that made me feel overwhelmed. Almost like I'm walking into some sort of museum with so much on display and secretly thinking to myself, oh gosh, that would probably be destroyed at my house with the boys. For now, the season I'm in is working with statement pieces and featured pieces.

What do I mean by featured pieces? It's those focal points in a room that your eyes are directly drawn to. The pieces that kind of make the whole room. That's where this wallpaper art, whatever you want to call it comes into play for me.

I love my dining room, but let's face it, it's not a room that gets used all the time. It is however one of the first rooms you see when you walk into my home. I shared about creating a statement entryway, and this is right off to the side when you walk in. You can look one way and see my living room (hoping to share more of that soon) or look the other and there is my dining room. The dining room has some great open wall space that I always knew I didn't want to clutter up. Not for anything, I actually love a clean and fresh blank wall, but I knew that I didn't want every wall in the dining room to be blank. I took some time and thought through what would make me happy to see in there all the time. Ahhhh, there we go, some framed peonies would make me happy.

My sister recently did a wallpaper accent wall in her bathroom with a similar print and I loved how it came out. We painted the base of our dining room table black so working in a black and white look with the peony wallpaper really ties things together. There are some great options for different peony designs, or you could really use any type of wallpaper that you like.
I knew that I wanted to keep the wallpaper exposed without getting a standard frame that had glass in front of it. I also knew that finding a frame with the exact measurements that I had in mind for our particular wall would be really difficult (you might be able to already find something off the shelf that works perfect for you). By the time that happened I might as well have made them myself. So that's what I did. Of course with the help of my husband who is always my righthand man.
This post contains affiliate links in which I get commission for purchases or clicks made at no additional cost to you. Thank you for your continued support.
PRODUCTS WE USED:
This section contains affiliate links in which I
Peony wallpaper (based off the the measurement we specifically needed)
Masonite hardboard panels (also based off of our specific measurements)
Semi gloss white trim paint
Measuring tape
Liquid nails
Caulk
HOW TO:
First you need to measure your wall space and decide how many panels you want to make and how much wallpaper you need to order. After you decide on a pattern you can start shopping for your other products. I feel like we pretty much live at home depot, so majority of the products I linked are from there or could can be found there. We had the masonite board cut in-store to the exact measurements we needed so it was set and ready to go.

A very important point I want to mention, is that where ever you are working on this project to make sure it is a very clean area. We have a dog, and three little ones, so crumbs and dog hair are kind of unavoidable, but man, they made things a little tricky. I swept and vacuumed twice, but then the dog would walk by and wag his tail, and well, you know how that goes. So anyway, try to have a very clean area because if a speck of dirt ends up under the wallpaper adhesive, it could be noticeable, and you also don't want it to rip through.

Once you have your hardboard panel laid out, start with the first pattern from your wallpaper order. This will depend on the style, and type you decide to go with. If it's a continuous pattern, they should be numbers in order of how they go. Depending on the size you are creating, there may be a seam on the panel, or you can measure and try to order to the exact size you need so that you only need to roll it out without a seam.
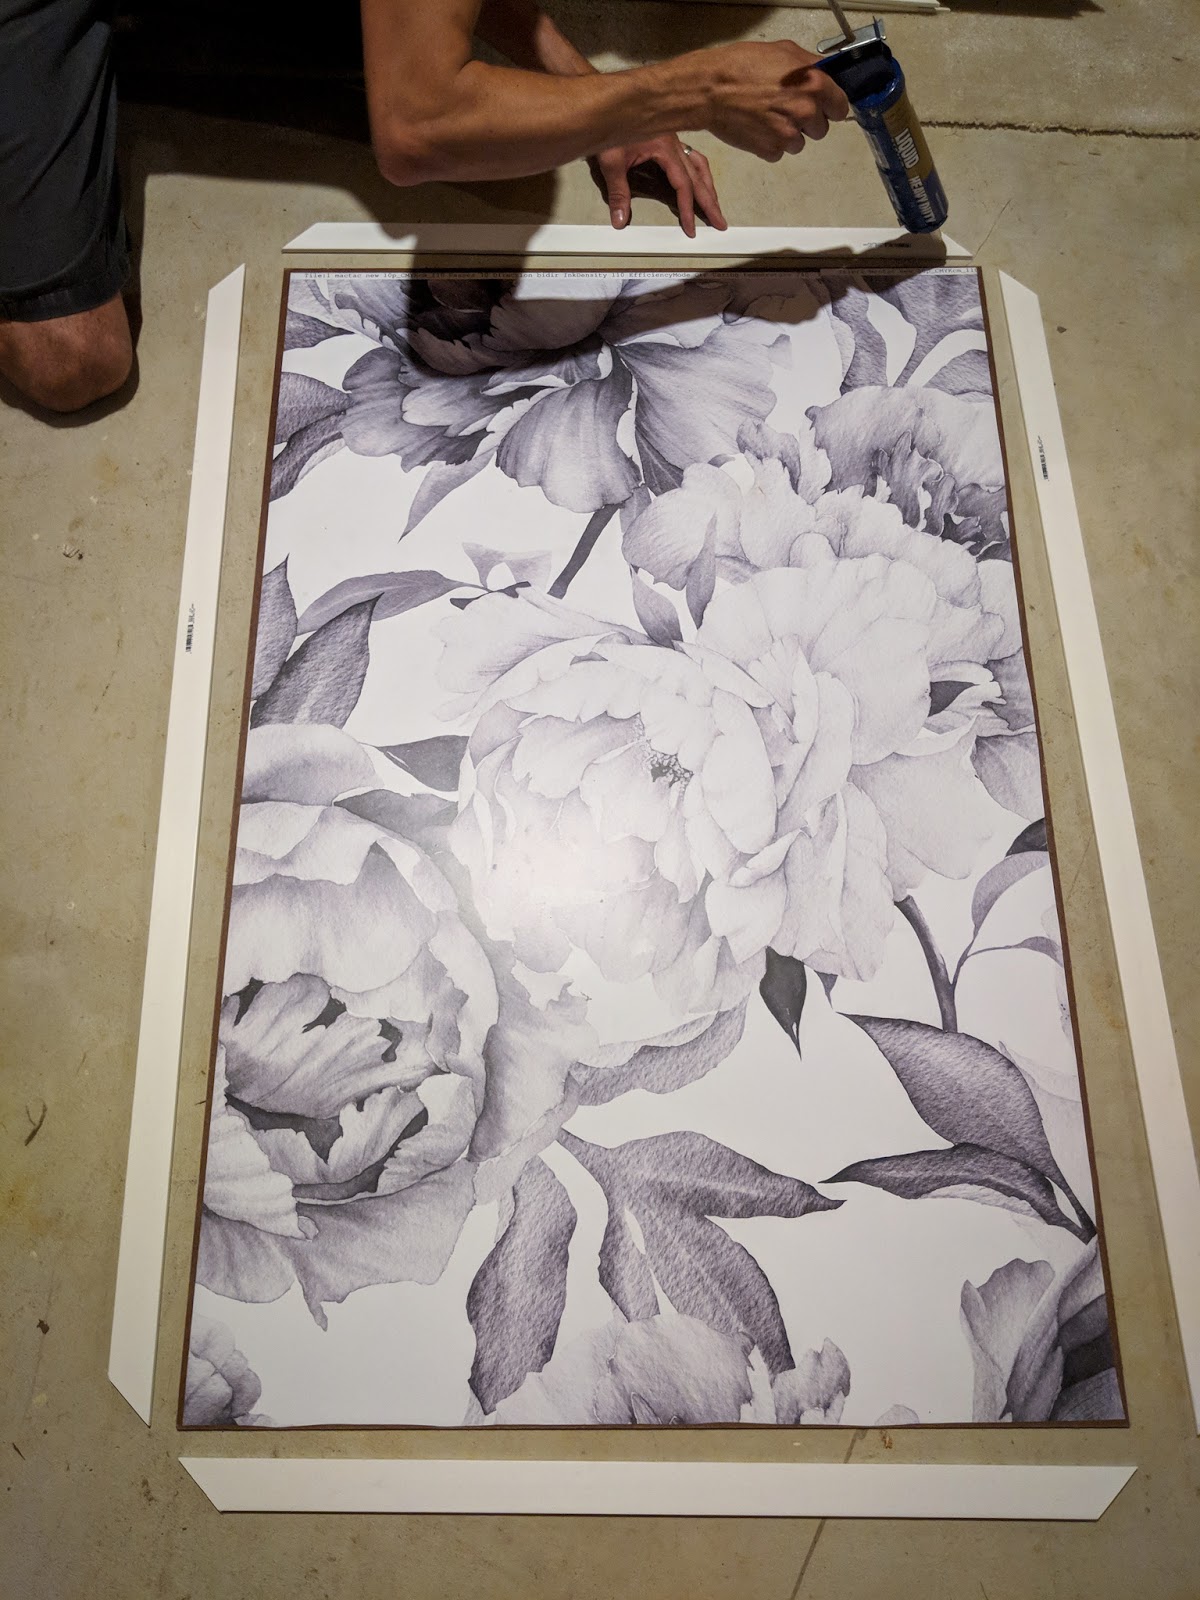
We used a peel and stick wallpaper which made it a lot easier because there were a few times we had to peel it back and realign it. Once you have your wallpaper set, you can make the cuts you need for your trim. You can decide if you want to paint them before you adhere them or paint them after you have them on. We used liquid nails for the trim and also put a few weighted items on the corners so they didn't turn up. We also did this project when it was extremely hot out, so I'm sure that played a factor in it.


No comments:
Post a Comment