Showing posts with label home decor. Show all posts

DIY Framed Wallpaper Panels

Ok, real talk, this probably seems so silly, but I just sat here for the last 5 minutes staring at my screen trying to figure out what to title this. Framed wallpaper art, DIY make your own framed wallpaper panels, DIY wallpaper (no, that's not really right because I didn't make the wallpaper). Is wallpaper really considered art? What exactly did I DIY? I mean, so much flooding my mind in such a small amount of time. And now I think I need a drink, of water that is...hold on brb. 

Ok, I got my water, even added a slice of lemon to it (we fancy), and now I'm sitting at my desk with full focus (hopefully) to share with you how we created these wallpaper masterpieces. Ah ha! Maybe that's what I should title this? Although, masterpiece status could probably be argued 10 ways to Sunday, so let's move on. 

Are you still with me after all that random rambling? I hope so. Because we're just about to get into the good stuff. These wallpaper thing-u-ma-bobs. If you caught my insta stories over the summer, then you probably saw a sneak peek that we were working on this little project. Most of you have probably heard me mention this before, that my decor approach has been about having less and focusing on some statement pieces throughout the house. If you're visiting, hear me out for a minute. I used to think that my walls needed to be filled with things, or a lot of decor pieces scattered throughout each room, in order for it to feel finished. Maybe it was more so that I thought I needed more to show because that showed I had somewhat of a sense of style. But what I think makes someone's style so unique, is their own approach to it. The things that make them happy, and what they feel when they walk into a room in their own home. Maybe some like having a lot on their walls because that's their sense of cozy. But what I noticed about myself was, walking into rooms like that made me feel overwhelmed. Almost like I'm walking into some sort of museum with so much on display and secretly thinking to myself, oh gosh, that would probably be destroyed at my house with the boys. For now, the season I'm in is working with statement pieces and featured pieces.

What do I mean by featured pieces? It's those focal points in a room that your eyes are directly drawn to. The pieces that kind of make the whole room. That's where this wallpaper art, whatever you want to call it comes into play for me.
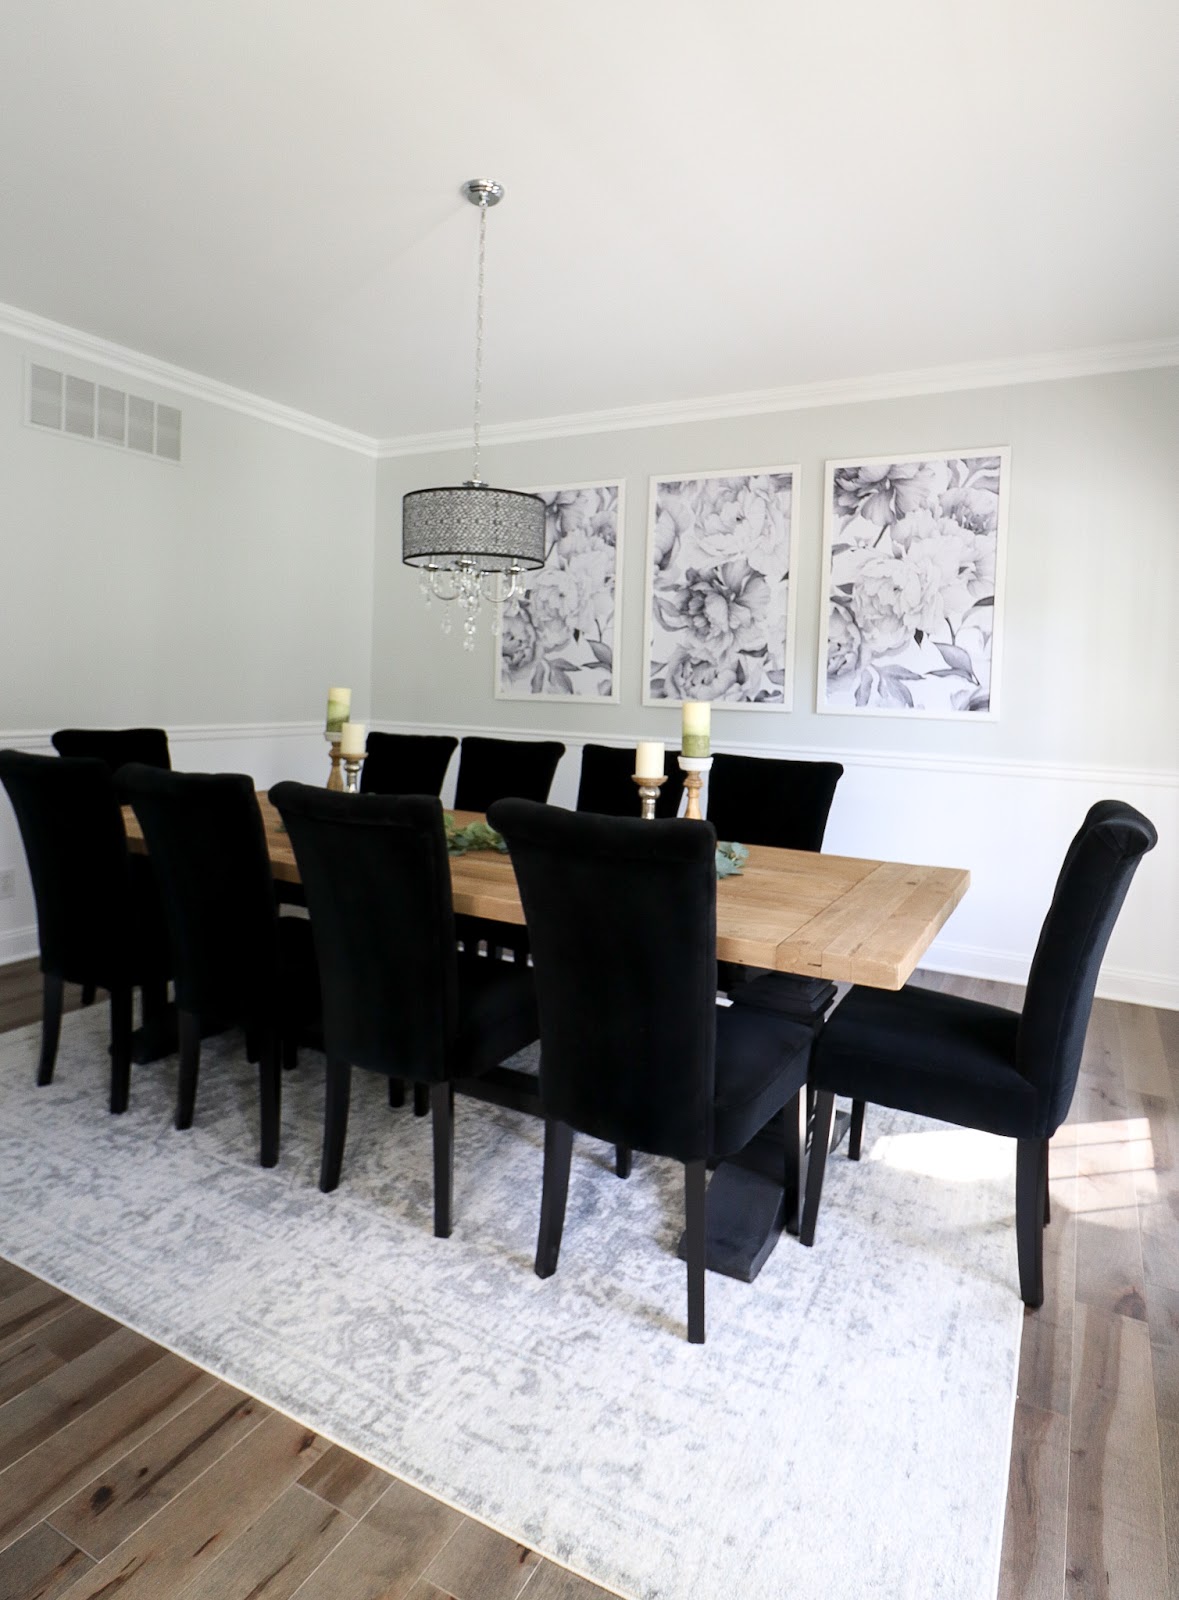
Framed-Wallpaper
I love my dining room, but let's face it, it's not a room that gets used all the time. It is however one of the first rooms you see when you walk into my home. I shared about creating a statement entryway, and this is right off to the side when you walk in. You can look one way and see my living room (hoping to share more of that soon) or look the other and there is my dining room. The dining room has some great open wall space that I always knew I didn't want to clutter up. Not for anything, I actually love a clean and fresh blank wall, but I knew that I didn't want every wall in the dining room  to be blank. I took some time and thought through what would make me happy to see in there all the time. Ahhhh, there we go, some framed peonies would make me happy.

My sister recently did a wallpaper accent wall in her bathroom with a similar print and I loved how it came out. We painted the base of our dining room table black so working in a black and white look with the peony wallpaper really ties things together. There are some great options for different peony designs, or you could really use any type of wallpaper that you like. 

I knew that I wanted to keep the wallpaper exposed without getting a standard frame that had glass in front of it. I also knew that finding a frame with the exact measurements that I had in mind for our particular wall would be really difficult (you might be able to already find something off the shelf that works perfect for you). By the time that happened I might as well have made them myself. So that's what I did. Of course with the help of my husband who is always my righthand man.

This post contains affiliate links in which I get commission for purchases or clicks made at no additional cost to you. Thank you for your continued support.

PRODUCTS WE USED:

This section contains affiliate links in which I
Peony wallpaper (based off the the measurement we specifically needed) 
Masonite hardboard panels (also based off of our specific measurements) 
Semi gloss white trim paint 
Measuring tape
Liquid nails 
Caulk 

HOW TO:

First you need to measure your wall space and decide how many panels you want to make and how much wallpaper you need to order. After you decide on a pattern you can start shopping for your other products. I feel like we pretty much live at home depot, so majority of the products I linked are from there or could can be found there. We had the masonite board cut in-store to the exact measurements we needed so it was set and ready to go.

A very important point I want to mention, is that where ever you are working on this project to make sure it is a very clean area. We have a dog, and three little ones, so crumbs and dog hair are kind of unavoidable, but man, they made things a little tricky. I swept and vacuumed twice, but then the dog would walk by and wag his tail, and well, you know how that goes. So anyway, try to have a very clean area because if a speck of dirt ends up under the wallpaper adhesive, it could be noticeable, and you also don't want it to rip through.

Once you have your hardboard panel laid out, start with the first pattern from your wallpaper order. This will depend on the style, and type you decide to go with. If it's a continuous pattern, they should be numbers in order of how they go. Depending on the size you are creating, there may be a seam on the panel, or you can measure and try to order to the exact size you need so that you only need to roll it out without a seam.
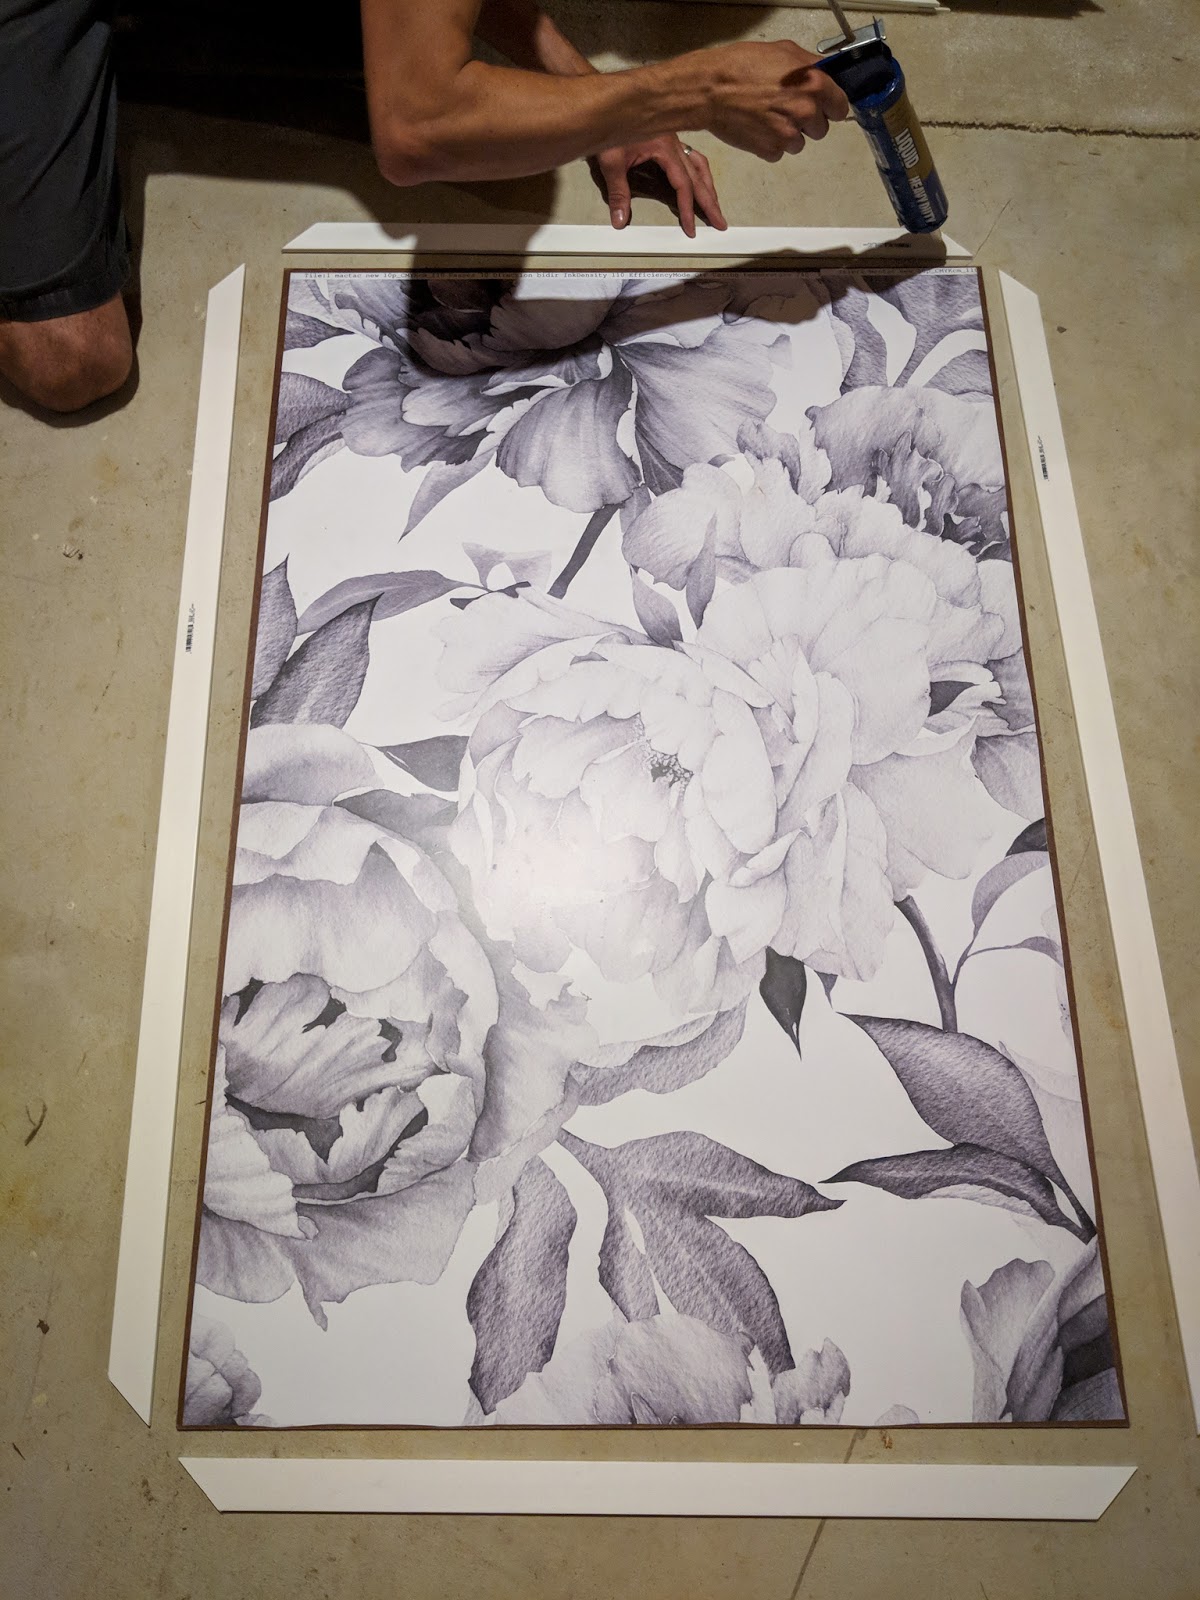
We used a peel and stick wallpaper which made it a lot easier because there were a few times we had to peel it back and realign it. Once you have your wallpaper set, you can make the cuts you need for your trim. You can decide if you want to paint them before you adhere them or paint them after you have them on. We used liquid nails for the trim and also put a few weighted items on the corners so they didn't turn up. We also did this project when it was extremely hot out, so I'm sure that played a factor in it.

Once the paint and liquid nails were dried, we used white caulk to go around the outside edges to give it a more finished look and fill in any gaps between where the corners of the trim meet. We let them sit and cure for a day or so and then hung them up.

We used picture frame hangers and made sure they would hold the appropriate weight for the size we went with and added felt pads to the back four corners to help prevent scratches on our wall. After your pictures are hung, you can sit back and admire them and enjoy the transformation that takes place. 

Framed Wallpaper Panels

Creating a Statement Entryway

I've always been a big admirer of beautiful statement front doors. There's something about pulling up to a home that has an eye-catching door that sets the tone for the whole house. 

This post is in collaboration with Doors4Home. All thoughts and opinions remain my own. 

One of the things that drew us to this house was the amazing wrap around porch. I envisioned myself sitting out here rocking my babies while catching the sunset. I feel incredibly blessed that I now get to live that out. There was one thing that I had a hard time getting past, the front door. There was a bright red door that I was never in love with. The house also has hunter green shutters and it just screamed Christmas to me. I knew changing out the front door was high on my priority list. I didn't want just any old door, though. I knew if we were going to make the investment, we were going to do it right. After searching around for some ideas, I knew that a double door, and particularly one with an arched look, would be perfect there. We were fortunate to have enough space to make it work and were excited to start the transformation with the front of our home.

I have always loved the look of a wood door and the timeless feel it creates. Having a solid wood door was important to us to give us the transformation we were hoping for.

Because we wanted a few particular things with our front door, like solid wood, a double door, and an arched look, we knew we couldn't just walk into any store and pick one off the shelves. That's where Doors4Home came into play. I cannot say enough good things about them and how easy they made this whole process. They have so many beautiful doors to choose from that fit your style and needs. They are also easily accessible and you can call with any questions or concerns. I loved that. We had several questions before placing our order and wanted to make sure we had everything right. We didn't have to wait on hold for hours on end and push a ton of buttons just to get ahold of someone. They ship doors all over the country and your door is custom made to your specifications. You also have 2 business days to make any changes in writing if need be. It really felt like personalized service which was a huge selling point for me.

After several weeks of production, our door was delivered and we were so excited to get it installed. We went with an arch top mahogany wood door in the finish of chappo. It was amazing to see the transformation take place right before our eyes. It motivated us even more to finish up some projects on the front porch and get it to an area that we really enjoy. We eventually want to transform the entire outside of our house (the door will be staying) but that will come with time.

For now, some new plants, furniture for our porch, and an entryway doormat, give it a little something extra on the outside. It's fun to sit out here and watch the boys play or have them rock in our chairs right along side of us. Little nugget also likes to sneak off and ring the doorbell when he can because he thinks it's just the funniest thing.

The inside also took on a major transformation and this door was the finishing piece to bring it all together. I know it might sound silly, but sometimes I catch myself peering over the railing from my upstairs and admiring it all.

This door lets in amazing light along with giving it a grand feel. When you walk in I have a small bench seat to the one side with a statement clock above it. That clock was Eric's grandfather's that he held onto. I love that we have it hanging there and that it holds a special sentiment.

If you watch my insta stories often you'll see that I share some projects and more personal peeks into our space. Some have commented that they love my style but that it's hard to classify. I would have to agree. I feel that styles constantly change but those staple pieces should be your anchor. Paint colors and accent decor can always be switched out. Things like a front door, or picking your flooring and backsplash, are more longterm commitments. I think if I had to narrow my style into categories, it would be safe to say it's a mix of modern farmhouse with a bit of glam. It's a little all over the place, but it works for us, and I think that's what matters. Being happy with your own home and confident with your design choices is so important.

Let's get back into talking about the entryway. When you come through the door and make your way down the hall, I also have a small table with some pictures and a mirror hanging above it. I got this mirror on a clearance rack and the color was originally grayish. I spray painted it black and I think it picks up the spindles from our railings really well. We also have a framed picture going down the hallway and leading into the kitchen. Eric found it in the trash outside of an estate sale (that's another story) and much to our surprise it was an original etched piece of art that we deiced to hang (see what I did there) onto and have it framed.

In all of my other houses there were always secondary doors that we used more than our main front door. This time around it's nice to have a dedicated entryway that creates the whole feel for our home. It's the main pass through. It's a place where you can walk into to create memories. Where new adventures are made.  And where we navigate the ins and outs of life.

What about you, what's something you love about your entryway or something that you would change?

Designing A Laundry & Mudroom Layout That Works Best For You

This post is in collaboration with California Closets. All opinions remain my own. 

I don't think it's much of a secret around here that laundry and I are not bffs. I actually don't know many people that really enjoy doing laundry. It's one of those necessities we can't really get out of doing though. I always joked around that if I had a pretty laundry room then I would be more motivated to want to do it. In our previous homes, our laundry was always down in the basement. In a way, it was nice to have it out of sight, out of mind. However, lugging baskets up and down several flights of steps and forgetting when you threw a load in was not convenient, at all. We never had a mudroom before and knew with three boys it was important to come up with a way to incorporate one into our home.

As odd as it sounds, I think knowing what we didn't want in a laundry room really helped us when it came to designing our new space. Speaking of designing, do you guys remember how I partnered with designer Leigh Heagney from California Closets on my master closet renovation? Well, California Closets did such a great job that we decided to use them for other projects as well. What I love about them is, they don't do just closets but sooo many other things. From playroom storage to garages, they offer a lot more than we realized and were able to transform this space into what we envisioned.

What you're seeing here was not the original laundry room. There was a previous laundry room that we will eventually be turning into a walk-in pantry. We decided to renovate and convert a downstairs bedroom that was being used as an office. For us, this space made so much more sense as a laundry/mudroom.

We did a lot to this room to make it the functional space we have now. We added in a staircase that comes up from our garage which really makes this the perfect spot to come in and hang up all of our coats and have a place to take our shoes off. I cannot tell you how amazing it's been to have a spot for all of our things when we come home. Before all of this, you would see shoes piled up near the front door, the boys would be running around in the morning trying to figure out where they left theirs, and somehow their jackets would randomly hang from whatever doorknob in the house they could reach.

Having a dedicated space for things has made such a difference and allows all of us to feel more organized. When we worked with Leigh she saw our vision and new that having a designated area to store our shoes, hang our coats, along with shelves to use for our hats and gloves, or whatever we needed, was the primary focus. We loved the idea of bench seating and having an area to sit and put your shoes on. It's worked out so well and we're so happy with how it turned out.
California Closets made the installation quick and seamless and transformed this space from a blank canvas to functional in no time. We wanted to go with finishes that would compliment the classic twenties inspired tile we have on the floor yet still create an overall neutral feel. We decided on the color Cashmere, which is a gray tone, that works out perfectly for this space.

Since this was not the original laundry room and we added in the staircase to the garage, we needed to get creative with how we could make this work for laundry. A stackable washer and dryer made the most sense next to the half wall that goes along the stairs. That area felt empty and unfinished and needed more functionality. I loved the idea of adding in a countertop and cabinet for extra storage and couldn't be happier with how it came out.

This area turned out even better than I thought. I love the surround that encases the washer and dryer and really gives it a finished looked. The extra storage overhead is an added bonus. I feel like you can never go wrong with extra storage.

We decided to go with a classic subway tile backsplash as an added design feature. We finished it off with the same gray colored grout that is also on the floor and picks up the Cashmere color from the bench seating and cabinet to tie everything together.

 
We added in some personal touches with pillows for the bench seating, decorative baskets, and a stool for easy access to reach things. I've been gravitating towards a less is more approach with my decor and letting the focus be on the features we are creating as apposed to having things feel over decorated or cluttered. One of my favorite finds was this cute little laundry cart. I don't know about your kids, but mine would be barefoot all the time if we let them. It doesn't matter how cold it is outside, the minute they get through the door and take their shoes off, their socks are coming off with them. We were finding socks allll over the place. This little cart is now dedicated as the sock cart and has been such a help for those stinky little socks to have a place to go.

As a boy mom of three I should have known spending my time in the laundry room was going to be inevitable. I mean, the laundry...NEVER.ENDS. I think I appreciate this space now more than ever because of the versatility it gives me and the storage space I have. The extra counter area has been so helpful and I love using it as a little folding station. My new motto has been to try and get through one load of laundry a day. I'm talking from start to finish...wash, dry, fold, and put away. Some days I'm a rockstar at it and others I'm trying to play catch up. The effort is always there and I'm so thankful to have an area to make it all happen now.

Laundry room decor
Do you have a designated laundry room or a mudroom? I'd love to hear about what you love about yours or what you would do differently if you were to redesign it.

Designing Your Dream Closet With California Closets

This post is in collaboration with California Closets. All opinions remain my own. 

Can someone pinch me? No, seriously. I really feel like I'm walking into a dream every time I step into my master closet. In fact, I'm not sure I've stopped smiling ever since California Closets finished the install (which took them all of a day and a half by the way). Join me on a peek inside my master closet and looking back on the process of designing it from start to finish.

Many of you know that Eric and I tackle a lot of renovations and home projects. It seems like we're always taking on something. So when we decided to tackle a full home renovation, I knew the master closet was something that needed major help. It was a standard dark closet with white wire racks that lacked any type of character. For me, I always knew having a dream closet was something I envisioned. Let me backtrack for a second. Eric and I have lived in older homes, I'm talking 1820's historic homes that had no closet space what so ever. If we wanted any type of closet space we were converting other rooms or building a closet just to have some storage space. It's just not very common in older homes to have a lot of closets. Having the opportunity to have any type of workable space to maximize our potential and achieve what we hoped for was a huge blessing.

I'm all about natural light in our home and making sure I had that in my closet was no exception. We put our heads together to figure out how to achieve that daylight shine I was longing for. We thought about cutting into the house to add in a window but that would have resulted in losing part of a wall that would have been valuable closet space. Luckily our attic is right above the closet and Eric came up with the idea to add in a skylight and vault the ceiling. In that moment I might have fallen in love with that man all over again, because, all the yes to that!

We began demo on the closet and getting it prepped for dream closet goals. Adding in that natural light and opening up the ceiling made a huge difference. After all of that was said and done, it was on to the fun part—the design phase! I've always been a huge admirer of California Closets and the work they do to transformer spaces. I was so excited to work with designer Leigh Heagney to take this blank canvas and turn it into a space that was perfect for me. Leigh came out to our house, took all of the measurements, and listened to my thoughts and opinions. She used her expertise to come up with a design that met my expectations and then some. Leigh communicated with us through the whole process and made sure any questions, concerns, or changes were properly conveyed. It's amazing to know that each design is 100% custom to fit your needs and your budget.

I was so anxious and could hardly wait for install day. I'm always reminding my boys to have patience, but I had to remind myself a few times because of course I would have loved to have everything happen over night. Remember, before it arrives at your house they are building it custom so there was a few weeks in between before it was time for install. When the installers arrived it might as well have been Christmas morning for me. It all felt like it happened so fast. They prepped the space, brought in the materials, and went right to work. By lunch time I could already see the closet coming to life and of course I had to sneak in there to get a glimpse.

Before I knew it, that special moment came and my closet was done. When the installers cleaned everything up and showed me the finished design, I may have hung out in there for a little while doing a happy dance. It was everything I could have imaged and more. Throughout the process your designer will provide you with a digital design to really allow you to get an idea of what it will look like when it's done. It's a great resource to have and was so helpful, but there's still nothing like seeing it all finished and being able to experience it in person.

I knew from the start I wanted a space that was light and airy. We went with a Chic Gray color for the walls and the finish on the closet details is Dove. I really enjoyed learning more about the products California Closets uses and how they aim to provide environmentally sustainable options. 

I wanted a space that was functional and allowed me to have plenty of storage options yet created a getaway for me. Ok, maybe I did let Eric have two shelves to put a few things in here because sharing is caring, but it's still very much my closet ;) Being a boy mom of three I have my fair share of, well, all things boys. I wanted this to reflect more of me and have a feminine feel to it. I couldn't pass up on the chandelier and adding in a bright runner along with having a way to display some of my handbags and my shoes. I also love how I now have easy access to my jewelry and can keep certain things tucked away in drawers.
After using my closet for several weeks now, I'm not sure there's really anything I would change about it. I know it might sound silly, but it's kind of empowering to be able to get up on a stool to reach for some of my things on the higher shelves. I keep joking that I want to get one of those library ladders and slide around my closet with it.

I'm so thankful I get to start my day in here every morning. From picking out my outfit, doing my hair, and sitting down to do my makeup. There can be crazy mornings where my boys woke up on the wrong side of the bed and it just feels like it's going to be one of those days. But when I come in here, shut my door, turn my music on, and get myself ready, I know I have another chance to have a different perspective on the day. 


Stay tuned because I'm really looking forward to sharing another space with all of you. It's a room I didn't think I would spend as much time in, but with a house full of boys, I should have known it was inevitable. 
Copyright © Beautifully Candid 2017. All Rights Reserved. Powered by Blogger.